And believe it or not, that is Me!!! For I have never considered myself a Wallpaper Artist, but just simply as someone that has always just been creating what I enjoy seeing on My Desktop and sharing it with Oh so many of You and believe it or not, it is so easy to do, that is if you know where to start and what to do!!! And That Is What This Blog Is All ABOUT...How To Make Desktop Wallpapers For Your Own Desktop and Hopefully You Will Share Them With All Of Us!!! And The Best Part Of All, You Can Get Started Do This For FREE!!! For More Information About What This Blog Is All About And How To Get Started Making Your 1st Wallpaper, Well Just Simply Click On...[About] Below...And Let's Get Started!!!

My 1st Wallpaper

Well if you have, then you are in the right spot for this Blog is totally devoted to teaching anyone how and it's all done with a "Free" Photo Editor that I have just found and I thought what a great way to pass on what I know and do to anyone and everyone that would like to know how Wallpapers are "BORN" and hopefully it might make for a Great Blog, or at least I'm hoping so!!!

So if you have ever wanted to create Your Own Custom Desktop Wallpapers, well now here is Your chance to give it a try with step-by-step instructions, not only telling you how, but also showing you how and when you are done, you will have created the exact same wallpaper has shown above!!! OK? Ok. Just click on [About] above to get started!!!

Your Wallpaper Buddy For Oh So Many Years Now
At Brent's Male Wallpaper's II - Reborn
()( BRENT )() 

And Now, Some Walls From Others That Want To Share Their Work With You....And before You Download/Save Something That You See and Want....Please Vote For It....It is just one simple click that is the heart beat of this Blog and it means so much to many that are sharing their work here!!!  And it is with the highest of hopes that you show a little bit of your love and support by either a vote on their postings and/or a comment....(Note: Comments are open to ALL, you do not need a Google Account to leave a comment here!)....For with out them, well there just maybe nothing here in the future for You to DOWNLOAD!!!!  Think About Guys and then at least CLICK A VOTE BEFORE DOWNLOADING!!!

Friday, February 28, 2014

New WP "Stick 'em Up Partner" By Bryan W.

(#1 In Standard Size 1024x768) 
(#1 In Wide Screen Size 1920x1200)
   
(And #2 In Standard Size Of 1024x768)
(And #2 In Wide Screen Size Of 1920x1200)
   
Shared By Bryan: "OK Brent, here is another wallpaper for your blog and this time I used the blend tool and the Yellow Contrast Gradient and then the Kaleidoscope Plug in to make the background. Hoping you and your blog fans might enjoy this one." Bryan
   
Wow Bryan, I must say that the first thing I thought of when I saw this wallpaper was "Ride 'em Cowboy" and I love how you divided the kaleidoscope image in half to create the background in your 2nd wallpaper which is currently on My Desktop.  Thank you so much for sharing this one with all of Us and looking forward to see what you and others come up with next Bryan.
   
Your Wallpaper Buddy Always
()( Brent )()
Here In California, USA

Friday, February 21, 2014

New WP "Just Married" By Bryan W.

(In Standard Size 1024x768) 
(In Wide Screen Size Of 1920x1200)
    
Shared By Bryan: "Hi Once again Brent and fellow would be wallpaper makers, my partner and I recently attended a Gay Wedding in northern California where they were legally married in the Eyes Of The Law in California!!!  Needless to say, this gave me the idea for this Wallpaper and hoping some of you with enjoy it.  Also Brent, I love the Kaleidoscope Plugin that You shared with Us, and I was able to install it with no problem and I'm playing around with it for my next wall". Bryan
   
WOW Bryan, I'm most impressed with how far you are coming along with your Wallpaper Making!!! This wallpaper for sure does capture "True Love" and well done My Wallpaper Buddy and thank you for sharing it with all of Us.  Also so glad to hear that You are enjoying the "Kaleidoscope Plugin" and looking forward to your next wallpaper as I'm sure many of this Blog Fans are also!
   
Your Wallpaper Buddy Always
()( Brent )()
Here In California, USA

Tuesday, February 18, 2014

Do More With Gimp And That Is With Gimp Plugins, As They Do Within Many Photo Editor's Like Photo Shop!

Hey All You Other Fellow Wallpaper Makers!!!  And while this is Not A Question/My Answer Posting, And while Yes I know I said that the only postings that were were going to be made here were Your Questions and/or Your Walls that You created that You wanted to share with all of Us, but I have some Great News to report to all of You as I keep playing around with Gimp and I was afraid that just by adding it to the "Tips And Tricks" Page here on this Blog, Many of You would not see it, so I'm doing this Special Posting for this reason.  And that is because one of the many things that I have enjoyed using over the past many years with All My Professional Photo Editors and that being the many "Plugin Filters" that are available on line and many of them are "Free".  These Plugin Filters let me do things above and beyond what the Professional Photo Editors can do and come to find out that Gimp also as "Plugin Filters" and there are a whole bunch of them that will let you do all kind of things within Gimp!!!  Just use your favorite search engine for "Gimp Plugins" and you will see what I mean.  But the reason for this posting is I just found for Gimp one of my favorite Plugin Filters known as "Kaleidoscope" that is just endless for creating backgrounds for Your Wallpapers!  And for those of you that may remember Bryan W. 1st Wallpaper that He shared with all of Us here whereas He used Gimp's Stone Pattern and the Fill Bucket to create His Background as shown here....
Well look at what Gimp's Kaleidoscope Plugin can do to that same background and just by using all the default settings for a single image....
So if you are like me and you are wanting to do even more with Gimp, check out all the Plugins that are available and they are, like Gimp, all "Free".  You will find the Gimp "Kaleidoscope" Plugin by clicking (Here).
  
Once you have downloaded the zip file and unzipped it, then please read the "KaleidoscopeReadMe.txt" in how to install it!!  Very easy to do and once you have none so then open up Gimp, create a background of your choice, and then click on "Filters/Animation/Kaleidoscope Animation" and then select "Single Image" for "Create Kaleidoscope On" and Your Background will end up with (5) layers and the last one being the Kaleidoscope of Your Original Layer that you then can copy and paste for a new background!!!  And as you will see, the settings for Kaleidoscope are so many, making what you want for a background, IS ABSOLUTELY ENDLESS!!!
    
Hoping this information is of Help to someone, and I'm sure Bryan will enjoy playing around with this one!!!...(((Big Smile)))  And if you have any problems getting this to work with Your Version of Gimp, please feel free to ask me for HELP!!!!
    
With Big Wallpaper Hugs,
Your One And Only One Wallpaper Buddy
That Is Just Trying To Help
You Make Some Awesome Walls
That You Will Share With All Of Us!!!
()(Brent)()

Sunday, February 16, 2014

New WP "Time To Weigh" By Bryan W.

( In Standard Size 1024x768)
(And In Wide Screen Size Of 1920x1200)

Shared By Bryan: "Hi Once Again Brent and Fellow Wallpaper Makers, that is if there are any?  For I sure would like to see some of your work if there are and hoping some of you are enjoy my walls. All I did to create this wall was I used a Locker Room Image found on the net for the background". Bryan
   
Didn't see this on the Winter Games on NBC and very cute and clever Bryan, and nicely done My Wallpaper Buddy. Great Job on Your Extractions!!!  And Yes there are others trying to make walls and I have been helping them out on a one-on-one basis.  And like you, I am also hoping that they will share there work at some time in the future.  And as for anyone enjoy your work, well Bryan just because there are no comments or very few votes, doesn't mean your work isn't being enjoyed.  In fact your last Wall, "Looking For A Hook Up" #1 has been downloaded 133 times in standard size and 97 times in wide screen so far, while your #2 Wall was downloaded 102 times in standard size and 83 times in wide screen, so Bryan, your work is being enjoyed by some!  Keep in mind, while this may not seem like a lot, but it was only posted four days ago and this new blog of mine isn't getting anywhere near the blog traffic as my wallpaper blog gets, but I'm hoping things will pick up as more and more walls are posted to it and/or questions. OK? Ok.  And Thanks Once Again For Sharing Your Most Clever Wall with all of US and hoping you will continue on doing so along with yours.
   
Your Wallpaper Buddy Always,
()( Brent )()
Here in California, USA

Wednesday, February 12, 2014

New WP "Looking For A Hook Up" By Bryan W.

(#1 In Standard Size 1024x768) 
(#2 In Standard Size 1024x768)


(And #1 In Wide Screen Size Of 1920x1200) 
(And #2 In Wide Screen Size Of 1920x1200)

Shared By Bryan: "Hey Brent, it's me once again and I'm beginning to understand so much more about what you have been doing for so long now, not to mention what Gimp can do and I'm totally "hooked" on making walls!!!  And like you on some of your collections that you have shared in the past whereas you posted two versions of what you where trying to create and couldn't make up your mind on which one to share, well I too am at that same point with my 2nd Wall that I wanted to share with you and your blog fans.  So I have attached both and both are in standard size as well as wide screen and I remembered my first mistake and copied the backgrounds from my standard size to the wide screen this time.  Hoping you will post both of them to settle the fight between my partner and I on which one is better and hopefully your blog fans will let us know which one they like best!!!  Bryan  Oh Yes, that thing about you also wanted us to share anything we did special about making our walls, well this time I used the Blend Tool and Gimp's Gradients, the 1st one was Brushed Aluminum using the Spiral (CW) option that my partner loves, while the second one that I love, I used the Flare Glow Angular 1 Gradient with a yellow/gray solid background behind it.  Looking forward to seeing which version your blog fans hopefully will let me and my partner know which one they like best and to show my partner that I was right!!!"
   
WOW Bryan, I'm simply blow away with your second Wallpapers and had no idea that Gimp is even doing such things for a background that you have found, and I might add, just as well, if not even better that what I have been using for the past five years with "Filter Forge" that I paid $199.99 for their full version years ago!!!!  Just goes to show you, "Free" is some times is even just as good if not better than what you have to pay for!!!  And while I'm most impressed with both Your Standard and Wide Screen versions this time, for they both look the same, but boy trying to pick between what your partner likes and what you like, that is a tough one.  So I will post them both for you and hope that My Blog Fans comment on which one they like best to let you know.  And Thanks Once Again For Sharing Your Most Handsome Walls with all of US.
    
Your Wallpaper Buddy Always,
Here in California, USA
()( Brent )()

Sunday, February 9, 2014

New WP "Ready For Action, Sir!" Redo By Bryan W.

(Wide Screen Size Of 1920x1200)

Shared By Bryan W. "You were right Brent, by copying the background layer from my standard size to the wide screen size and then re-sizing it, the rocks in the background are not so small any more and I didn't even see this till I saw both of my walls on your blog.  I have attached the redo of it for you so that you can post it for your blog fans with wide screen monitors.  I will remember this tip when doing my next wall."  Bryan
   
Thanks Bryan, now both versions of Your Wallpaper look the same.  Job well done Wallpaper Buddy, (Brent)

Saturday, February 8, 2014

New WP, "Ready For Action, Sir!" By Bryan W.

(In Standard Size Of 1024x768)
(And In Wide Screen Size Of 1920x1200)

Shared By Bryan W. "Thank you so much for your help Brent and I'm happy to report to you that both of your tips helped me a lot and I was able to create the wallpaper that I was wanting that I'm calling "Ready For Action, Sir!".  And like you, I made it in both sizes that I have attached and I'm hoping you and your blog fans might enjoy my 1st wallpaper!  Any comments on how I can improve it would be great!  Bryan  OH!, you also wanted us to share anything we did special to make our walls, well the only thing I did that is not on your Blog was I used Gimp's "Rocks" Pattern for my background and since after extracting the stud, he seemed to be little bit blurry so I used sharpen under filters/enhance to make him clearer."
   
Hey Bryan, It is so great to see that You are a Man of Your word and THANK YOU, THANK YOU so much for being the FIRST here on this New Blog of mine to share His Work with all of Us!!!  And I'm so glad to see that my tips worked for You and If I may say, in a most wonderful way!!!  For Your Stud in "Ready For Action, Sir!" is just that...(((Big Smile))) ...And I'm loving it.

And thanks of letting Me know about Sharpen within Gimp,  I use this tool all the time within my Professional Editors and didn't even know Gimp had it!!!  Way, Way Cool.  And as for a comment in how to improve your Wallpaper Bryan, the only thing I would suggest is rather than using the "Fill Bucket" for Rocks for the background on Your Wide screen version, is to copy the background from Your Standard Size Wall and then paste it has a new layer in Your Wide Screen Wall and then re-size it.  This way the rocks will not look so small as they do now compared to Your Standard Size background.  Give it a try and you will see what I mean Bryan.  And Thanks Again On Being The First To Share His Work Here On This Blog!!!

With Love & Hugs
Your Wallpaper Buddy Always
()( Brent )()

Friday, February 7, 2014

A Question From Bryan W.

A Question From Bryan W. that read.....
"Been a fan of your work for the longest of time and I'm totally enjoying your new blog and I must admit to you that you have but a tickle in my pickle and I'm totally enjoying playing around with Gimp.  But I sure could use some help with trying to extract a stud that has extra hairy arms and legs and also with long hair, nothing I'm doing looks that good, how do you remove the background from studs like this Brent?  Bryan W.  PS: If you can solve this one for me, I promise You I will share my next wall with you and your blog fans."

Right On Bryan and what a Great Question this is, and I totally understand your problems and I'm Holding You To Your Promise, Since You ARE The First Follower Of This Blog!!! (((Big Smile))) So this his how I extract Extra Hairy Men and it is somewhat tricky and Men with Long Hair are even trickier, but both can been none within Gimp and here are two examples of this....
   
First, Men with hairy arms, legs and body hair as shown here by this stud...
The trick here Bryan is YOU DO NOT WANT TO JUST ERASE to the edge of the hair on His Arms, Legs and/or Body as shown here has zoomed in on this Stud's Chest...
For when you do it this way, He is going to look like you HAVEN'T DONE A CLEAN extraction of Him when placing Him on a Background, as I have done and shown by the Red Arrows showing how dirty He will look on a Wallpaper of Standard Size as shown here...

But I have found that by erasing a Stud with extra body hair all the way down to the edge of HIS SKIN on his arms, legs and body, as shown here, which is zoomed back in on His Chest...
And while yes you will be removing some of His Hair all the way around His Body as shown here....
But He still will come across has a very hairy Man on Your Wallpaper as shown here on the same background in a standard size wallpaper....
Hoping you see what I mean and this answered your 1st question of how to extract extra hairy men.

Now for the Second Part Of Your Question, Men with long hair as I'm showing here and I just used within my last Wallpaper Collection...

And here is a New Trick I haven't shared on this Blog yet and that is using Gimp's "Fuzzy Select Tool" and it works great for the task of removing background with men with long hair in most cases, not to mention other areas.  First click on the "Fuzzy Select Tool" in the tool box, as shown with the Red Arrow, and then moving your mouse to select the area that you are wanting to remove, in this case it is the "white area within the fold of his left arm" as shown by the Blue Arrow and left clicking on that area as shown here...
This now becomes the ONLY AREA THAT IS ACCESSIBLE TO OTHER GIMP TOOLS!!!  So simply click on the "Eraser Tool" and using a rather large eraser, for it does matter how large it is, the only part that can be erased is what is within the dotted triangle shape of the fold of His arm and in this case it's the "White Area" and erase all of it and after you have done this, this is what is shown....
Yes it's not so clean, as it is with many automatic extractors within my Professional Photo Editor's than I'm not that fond of,  but better than doing it by hand. Then I did the same for the other white areas within His hair and on the other side of his head and after doing so, this is what He looked like....
Then I zoomed all the way back out and clicked on the Fuzzy Select Tool once again, and then left click somewhere outside the photo, this TURNS OFF THE FUZZY SELECT TOOL and then I once again have full access to ALL of the photo and using a small eraser to finish cleaning up what white background remained till I had this...

And then when I placed Him on the background I had chosen, His long hair was still in place with about 99% of the white background removed as shown here in Standard Size...

Hoping this information is of Help to not only You Bryan, but also others.
   
Your Wallpaper Buddy Always,
That Is Just Wanting To Help Other's Do The Same
()()( Brent )()() 

PS: And if not, then Please Let Me Know!!!  Other wise, I'm looking forward to posting Your FIRST WALLPAPER!!!

Tuesday, February 4, 2014

A Question From Pat P.


A Question From Pat P. that read.....
"Have been a long time fan of your wallpapers.  Love your new blog.  And I've been working on a new wallpaper since I found your new blog.  Mine are OK, But I'm hoping that I can improve them.  A lot of my edges are fuzzy and have been working on them.  If you have any suggestions on how I can improve them,  please let me know.  Thanks."

And My Answer..
I hear you loud and clear Pat, and believe it or not, I found the same problem when I first starting doing my extractions of studs for the Walls way back in 2009 when I was trying to make my first ones!!!  The trick here, at 
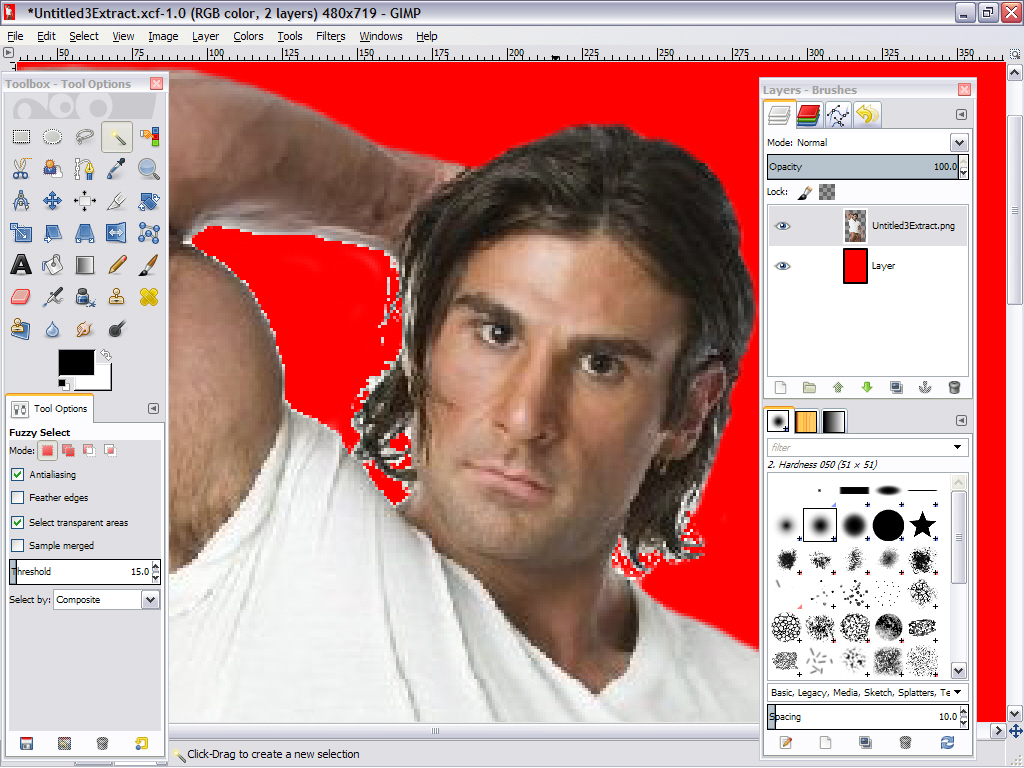
least for me that is, after doing what I call the "Rough Extraction" as shown here, (which just happens to be what I'm working on for My Next Posting on My Wallpaper Blog)....

And I'm amusing that is what you have already done so far, a 
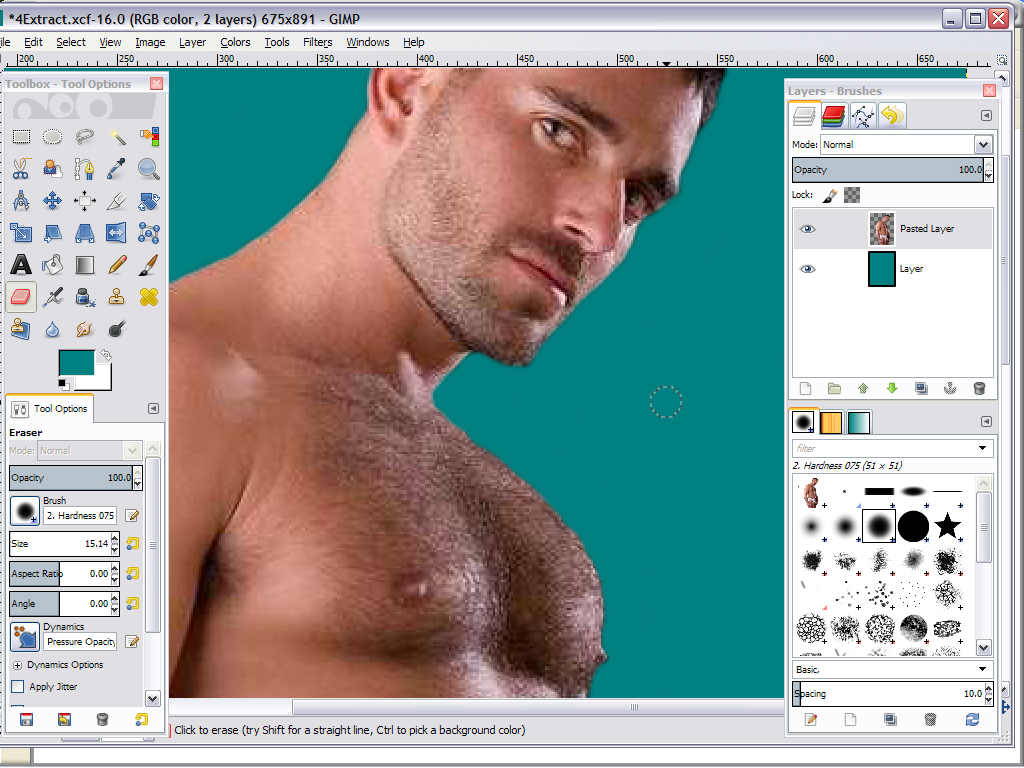
rough extraction that is, I would recommend to You that You Zoom way in on the Stud that you're trying to extract to the point that you are only able to see just a small portion of His Photo, like just the upper part of His shoulder, as shown here that I'm working on....
And that you are using an eraser Bush hardness of .075 , or you might even try using an eraser Bush hardness of 100 within Gimp, before you begin your final extraction of Him,  and working your way up from His shoulder, to the top of His head, as I have done above.
And when you zoom all the way back out you should see a nice clean edge of what you just erased, as shown here....
This is how I get a nice clean extraction of Studs within Gimp and that I'm now using for My All My Wallpapers on My Blog!!!  For I'm Finding Some Things Within Gimp, I'm not even finding within ANY OF My Pro Editor's And I'm Loving What Gimp Is Doing!!!
   
Hoping this Answers Your Question And As Been Of HELP to You Pat and also to others!!!
   
Your Wallpaper Buddy Always,
That Is Just Wanting To Help Other's Do The Same
()()( Brent )()() 

PS: If You're Not Please With My Answer, Then Please Let Me Know!!!  Other wise, I'm looking forward to posting Your FIRST WALLPAPER!!!
Related Posts Plugin for WordPress, Blogger...